Netgear EX3920 Setup
Netgear EX3920 Setup | AC750
Netgear EX3920 WiFi extender repeat your existing WiFi signals and boost your internet range throughout your home with two WiFi range extenders. In addition, Netgear EX3920 AC750 range extender delivers the WiFi speeds up to 750Mbps. So, after Netgear EX3920 setup, you can increase the range of your existing network for all the tablets, smartphones, computers, laptops, and more.
Netgear AC750 setup | EX3920
Netgear EX3920 Manual: When you buy a brand new Netgear EX3920 AC750 WiFi extender, you receive a Netgear EX3920 manual with it. EX3920 AC750 WiFi range extender manual consists of a series of Netgear EX3920 setup steps from starting to end. You just have to follow the Netgear EX3920 AC750 range extender setup instructions given on the manual and make it up and running.
Netgear AC750 EX3920 Extender Setup | Netgear Installation Assistant
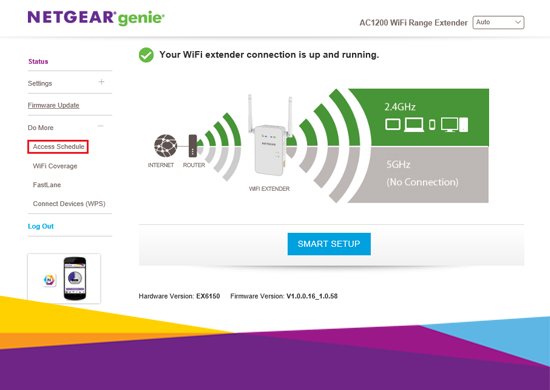
To complete your Netgear EX3920 wireless range setup using the Netgear installation assistant follow the steps given below.
- Plug your Netgear AC750 WiFi extender into a working wall socket.
- Open an internet browser on your PC or laptop and enter mywifiext in the address bar.
- New Extender Setup page displays.
- Select the WiFi range extender button and click on Continue.
- Now, enter the network password or passphrase and click on Next.
- Connect your WiFi-enabled devices to your Netgear AC750 EX3920 range extender and click on Continue.
- Complete the registration fields and at last, click on FINISH to complete the Netgear AC750 EX3920 extender setup process.
- Now, unplug your Netgear wireless range extender and move it to a new location that is near to your existing WiFi router.
Netgear AC750 Setup | EX3920 | WPS Method
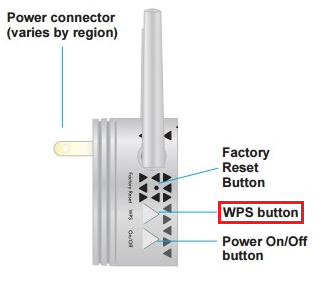
Set up Netgear extender– EX3920 AC750 using WPS:
- Plug your Netgear EX3920 WiFi range extender into a working wall outlet that is near to your existing WiFi router.
- Locate the WPS button on your Netgear AC750 extender.
- After that, push and hold the WPS button on your Netgear EX3920 extender. Release the WPS button carefully.
- After a few minutes, push the WPS button on your existing WiFi router. The WPS LED on your Netgear EX3920 AC750 extender will become solid green and the 2.4 GHz (Gigahertz) Link Rate LED will light up.
Note: If your main WiFi router supports the 5 GHz band, simply repeat steps 1 and 2 and connect your Netgear EX3920 AC750 extender to the 5 GHz band.
- Move your Netgear AC750 WiFi extender to a new location and connect your WiFi-enabled devices to the Netgear extender’s WiFi network.
- That’s how you can complete your Netgear EX3920 setup using the WPS method.
Netgear EX3920 WiFi extender | Enable FastLane Technology
FastLane technology offers you the highest WiFi performance. Basically, it provides a high-speed internet connection with a dedicated band connecting your Netgear EX3920 range extender to your existing WiFi router and a second band connecting your Netgear extender and a WiFi device.
Follow some steps given below to enable the FastLane technology after Netgear extender EX3920 extender setup:
- Load up a web browser on a desktop or laptop.
- Type mywifiext.net or Netgear extender’s default IP address into the browser’s address bar.
- Enter default login credentials and click on the Log In button.
- Click on the FastLane Technology radio button.
- Now, you will get two options: ‘Device-to-extender in 5 GHz only and extender-to-router in 2.4 GHz only’ and ‘Device-to-extender in 2.4 GHz only and extender-to-router in 5 GHz only’.
- Click on the Apply button to save the settings.
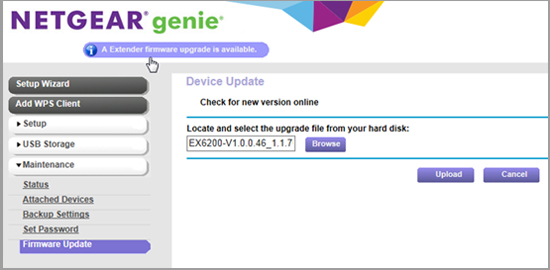
Netgear AC750 EX3920 Firmware
How to update Netgear extender’s firmware?
Does your Netgear AC750 EX3920 WiFi range extender behave weirdly? Is your Netgear AC750 WiFi extender not providing the expected WiFi speed even after Netgear EX3920 WiFi extender setup? If yes, then update Netgear extender’s firmware right away.
Update Netgear AC750 firmware:
- Plug your Netgear EX3920 WiFi extender into a working wall socket.
- Pull up up a relevant web browser on a computer or laptop and type mywifiext.net or default IP address of your Netgear EX3920 into the browser’s address bar.
- Netgear EX3920 AC750 login page displays.
- Select the Firmware Update option.
- If the new firmware version is available, follow the instructions given on-screen and update Netgear extender’s AC750 firmware.
Netgear EX3920 WiFi Extender | Common setup issues
- Netgear EX3920 WiFi extender connected but no internet.
- WiFi extender not working.
- Router can’t connect to Netgear AC750 WiFi range extender.
- Incorrect username and password.
- Forgot Netgear extender’s security key.
- AC750 range extender not connecting to the internet.
- LED lights are not stable on Netgear EX3920 extender.
- Cannot access Netgear Genie setup wizard.
- Can’t find the Netgear extender network name (SSID).
- Unable to update Netgear EX3920 extender’s firmware.
- Unable to perform Netgear EX3920 reset process.
- Netgear Genie continues to appear even after Netgear EX3920 AC750 WiFi range extender setup.
- Mywifiext.net not working.
- Errors while accessing mywifiext.local.
- Issues while accessing the Netgear extender’s default IP address.
- Lost Netgear EX3920 setup CD.
Netgear EX3920 Extender | AC750 Troubleshooting steps
Go through some easy troubleshooting steps below-mentioned to fix Netgear EX3920 WiFi range extender not working issues instantly:
- Avoid placing your Netgear EX3920 AC750WiFi range extender near to juicers, mixer grinders, thick walls, microwave ovens, cordless phones, Bluetooth speakers, metal appliances, security alarms, baby monitors, etc.
- Update Netgear extender’s firmware and your existing router’s firmware timely.
- Ensure that your Netgear AC750 extender is placed within the reach of your existing WiFi router.
- Change the default login credentials after the Netgear WiFi extender setup process.
- Plug your Netgear EX3920 WiFi range extender into an active wall socket.
- Connect your WiFi router and your Netgear EX3920 extender through an Ethernet cable.
- Type 192.168.1.250 or mywifiext correctly into the browser’s address bar.
- Do not use an outdated version of the internet browser.