How to Setup Netgear Extender Using Ethernet Cable

How to Setup Netgear Extender Using Ethernet Cable

Setting up a Netgear WiFi extender using an Ethernet cable is one of the most reliable methods, especially if you want a stable and error-free installation. This wired setup ensures a strong connection between your router and extender during configuration, reducing chances of setup failures. In this guide, we’ll walk you through the complete step-by-step process using Routerlogin.net and 192.168.1.1.

What You Need Before Setup

Before starting, make sure you have the following:

  • Netgear WiFi extender
  • Main router (working properly)
  • Ethernet cable
  • Laptop or desktop
  • Power source

Having everything ready will make the setup process smooth and quick.

Step 1: Power On Your Extender

  • Plug your Netgear extender into a power outlet
  • Turn it on and wait for the LED lights to stabilize
  • Ensure the power light is solid

This indicates that your extender is ready for setup.

Step 2: Connect Extender to Router via Ethernet

  • Take an Ethernet cable
  • Connect one end to your router
  • Connect the other end to the extender

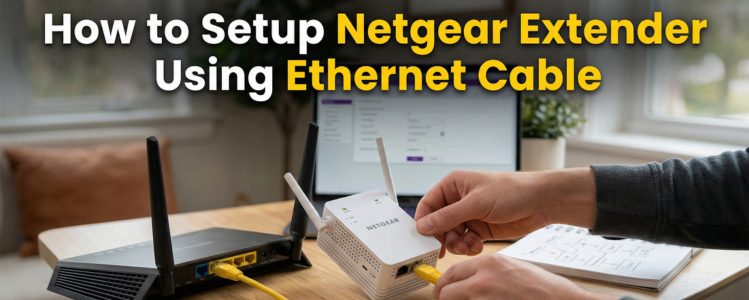
This creates a direct wired connection, which is ideal for setup.

Step 3: Connect Your Device

Connect your laptop or PC to the extender using:

  • WiFi (default extender network), or
  • Another Ethernet cable (recommended for stability)

Step 4: Access Setup Page

Now you need to access the extender’s setup interface.

Method 1:

  • Open a web browser
  • Type 192.168.1.1 in the address bar
  • Press Enter

Method 2:

  • Type Routerlogin.net in the browser
  • Press Enter

Both methods will take you to the Netgear extender setup page.

Step 5: Log in to Setup Wizard

  • You will see the Netgear Genie or setup wizard
  • Click on New Extender Setup
  • Create an account or log in if required

Step 6: Configure Extender Settings

Follow the on-screen instructions:

  • Select your existing WiFi network
  • Enter your WiFi password
  • Choose extended network names (SSID)
  • Configure security settings

Step 7: Complete Setup

  • Click Finish or Apply
  • Wait for the extender to save settings
  • The extender will reboot automatically

Step 8: Test the Connection

  • Disconnect the Ethernet cable (if needed)
  • Place the extender in a suitable location
  • Connect your device to the extended network
  • Check internet speed and connectivity

Best Placement Tips

For optimal performance:

  • Place extender halfway between router and dead zone
  • Avoid thick walls and metal objects
  • Keep away from electronic interference

Proper placement ensures better signal coverage.

Troubleshooting Setup Issues

Unable to Access Setup Page

  • Ensure correct IP (192.168.1.1)
  • Try Routerlogin.net
  • Clear browser cache
  • Use a different browser

Login Page Not Loading

  • Check Ethernet connection
  • Restart router and extender
  • Ensure device is connected to extender network

Extender Not Connecting to Router

  • Re-enter WiFi password
  • Move extender closer to router
  • Reset and try again

Reset Extender (If Needed)

If setup fails:

  • Locate reset button
  • Press and hold for 10 seconds
  • Wait for reboot
  • Restart setup process

Benefits of Ethernet Setup

  • More stable connection during setup
  • Faster configuration process
  • Reduced chances of errors
  • Better initial synchronization

This method is ideal for beginners and professionals alike.

Common Mistakes to Avoid

  • Skipping Ethernet connection
  • Entering wrong WiFi password
  • Placing extender too far during setup
  • Interrupting setup process

Avoiding these mistakes ensures a smooth setup experience.

Final Thoughts

Setting up your Netgear extender using an Ethernet cable is one of the easiest and most reliable methods. By accessing the setup page via Routerlogin.net or 192.168.1.1, you can quickly configure your extender and enjoy improved WiFi coverage throughout your home.

This wired setup method minimizes errors and ensures a strong connection, making it perfect for users who want a hassle-free installation process. Follow the steps carefully, and your extender will be up and running in no time.

Tags:
Disclaimer: The netgerext.net is a website providing technical resolution and information on various issues and providing online support services for networking gadgets. Use of any images, logo, brand or product names on our site is just for informational and referential purpose. Technical help & services are provided on customer request.