Connecting the Netgear WiFi range extender to an ATT U-verse router is not a big deal. You just need to access the management console of the Netgear extender and put in the WiFi details mentioned on your U-verse router’s sticker. But, how to do that? This blog will explain everything. Apart from this, we will share an alternative method to connect Netgear WiFi extender with ATT home internet router. So, are you ready? Let’s get started then.
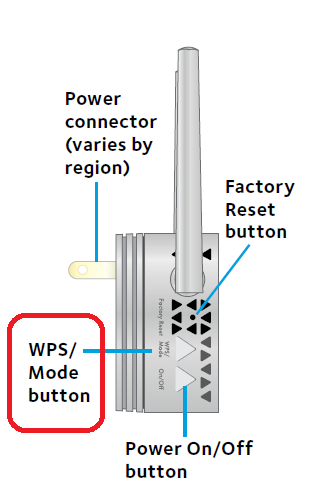
If you want to successfully connect your Netgear WiFi range extender to the ATT U-verse home router, your extender must be flaunting the default factory settings. So, if your Netgear extender was set to work with another WiFi router previously, you should reset it to the default factory settings. For this, simply push and hold the Reset button on the extender with the help of a pointed object. As soon as the LEDs on your Netgear device stabilize, you can start the connection process.
The table given below will help you learn the prerequisites of connecting the Netgear WiFi range extender to an ATT U-verse home internet router. For your ease, we have mentioned them as per the approach being used for the connection process:
| Wired Connection | Wireless Connection |
|---|---|
| Netgear extender running on default settings | Netgear extender operating on factory-set details |
| The default admin info of the extender | Your U-verse router |
| The WiFi details of ATT U-verse router | |
| A pair of Ethernet cables | |
| A PC/laptop | |
| U-verse router |
Although the prerequisites to complete the connection through a wired mode are more, still it is the most preferable method that can help you achieve success with the process. You can opt for the wireless mode of connection if your ATT U-verse home router supports the WPS configuration.
We will first shed light on the steps to connect your Netgear extender through a wired source of connection. After that, we will be shifting our focus to connecting the ATT home internet router and the extender using a wireless source. Here’s what you need to do.
In case you don’t know about the ports to be utilized to connect Netgear WiFi extender with ATT home internet router, you need to know that the router will be serving as an internet source. Given that, the RJ45 (Ethernet) cable must go into the extender’s Internet port and the router’s LAN1 port. We suggested the LAN1 port because there is a possibility that other ports have been closed from your ISP’s end.
Here completes the process of connecting Netgear extender to the ATT router using a wired source of connection. After that, you can connect your wireless clients to the Netgear network i.e. Netgear_ext, and enjoy the enhanced coverage.
If you own a U-verse router that has arrived with a WPS button on it, then this section will serve your purpose. Here, you will learn how to connect Netgear extender to ATT U-verse router using wireless approach. Follow the steps given below for that.
If you deeply look at both methods to connect Netgear WiFi extender with ATT home internet, then you might find the wireless approach easy. But, there’s a catch. You need to log in to your extender after the connection process and customize a few settings. However, the wired method is all about customizing the settings of the extender through a computer.
The chances of getting successful with the process are also higher in the wired connection method. Now, we hope that you’ve learned how to connect Netgear extender to ATT home router, and with the same anticipation, we are now wrapping up.
Tags: Connect Netgear Extender, Netgear Extender to ATT U-verse Router
Dave Francis is a WiFi network expert and a technical writer dedicated to helping users optimize their home networks. He focuses on providing clear, actionable steps to help readers get the best service out of their devices. With the background in Information-Technology and passion for WiFi devices, he provides practical advice and solutions for setting up and managing Wi-Fi devices. He breaks down technical issues and offers simplified solutions through easy guides and tutorials.

