How to Connect Netgear WiFi Extender without WPS?

How to Connect Netgear WiFi Extender without WPS?

One should connect Netgear WiFi extender without WPS if his router does not support the WPS configuration. There are two ways using which one can avoid the WPS approach to complete Netgear WiFi extender setup. The first method uses the app whereas the second method requires a person to access the login address of the range extender. Let us find out how.

Before You Connect Netgear WiFi Extender: Before you connect Netgear extender to router, you should ensure that the extender is working on factory default settings. To do that, press the extender’s Reset button. You can do it with the help of a sharp object.

How to Connect Netgear WiFi Extender via App?

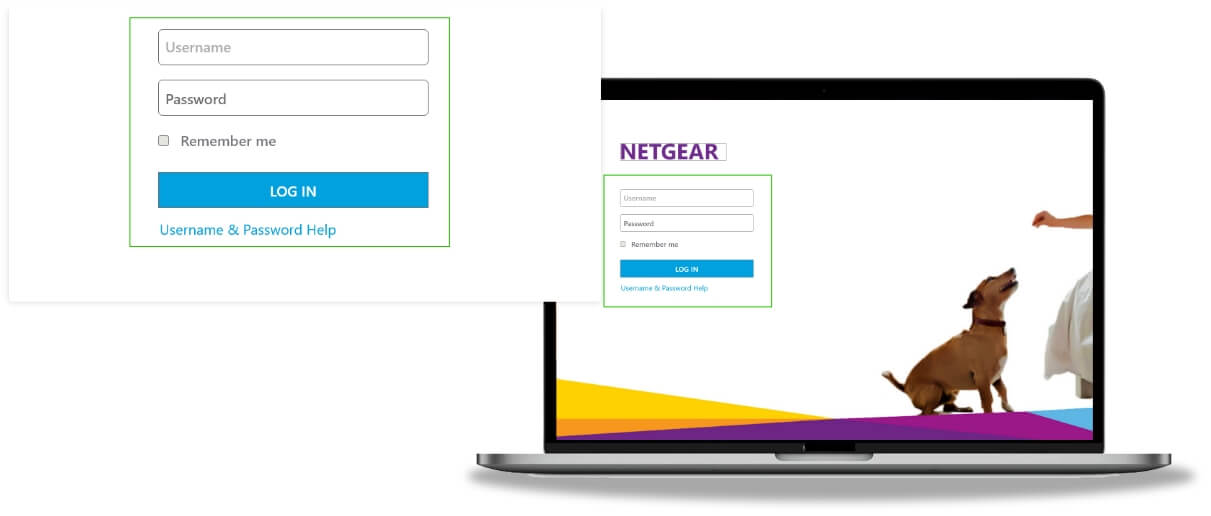
Now that you have reset the extender, you are all set to connect it via the Nighthawk app or the manual method. This section will cover the Nighthawk app steps. Here’s how you can connect Netgear WiFi extender without WPS via an app:

  • Place your Netgear extender and the main router in the same room.
  • You can now switch on your devices.
  • Unlock your mobile phone, disable mobile data, and enable WiFi.
  • You will see a list of WiFi networks.
  • Find the network with the Netgear_ext label and connect to it.
  • For WiFi password, check the label of your Netgear extender or its user manual.
  • Once done, open Play Store on your mobile phone.
  • If you are using a Mac, go to app store.
  • Type Netgear Nighthawk app.
  • Select the app from the displayed results and download it.
  • As soon as the Nighthawk app gets installed, launch it.
  • If you are using the app for the first time, you will be prompted to create a Netgear account.
  • Once logged in, go through the on-screen instructions.
  • The Netgear extender will get connected!

How to Connect Netgear WiFi Extender Manually?

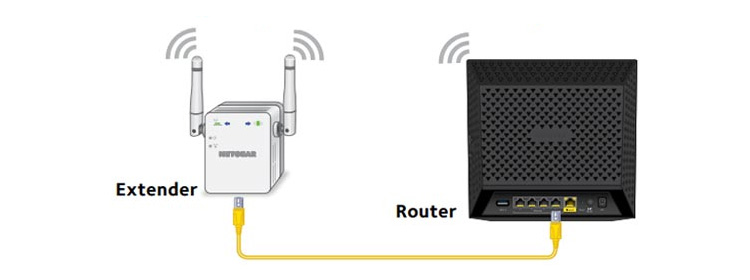
If you want to use the manual method to connect Netgear WiFi range extender, you will have to take the help of a PC. An Ethernet cable will also be involved in the process. But, first of all, write down the SSID and WiFi password of your main router. You will need them to connect WiFi extender without WPS. The steps are mentioned below:

  • Power up your Netgear extender and the main router after placing them in the same room.
  • Once the lights on your extender are green, connect it to PC using an Ethernet cable.
  • You can also connect via Netgear_ext in case there is no Ethernet cable available.
  • Run an internet browser now.
  • No matter whether you choose Chrome or Edge, the chosen browser should be updated.
  • Into the address field, type mywifiext.net.

mywifiext.net-interface

  • Press the Enter key.
  • You will be taken to a page asking for terms and conditions.
  • Accept them and move on by clicking Next.
  • A network scan will happen now and you will soon see a list of available networks.
  • Look for the network that belongs to your existing router.
  • Select it and input the respective WiFi password.
  • Click Connect.
  • The next window will ask you to create an admin password for the extender.
  • You may be prompted to answer a few security questions.
  • Answer them accordingly and create SSIDs and passwords for both frequency bands of the extender.
  • Save the changes.
  • Register your extender on the next window with the help of your Netgear account.
  • The extender has been successfully connected.

In this way, you can connect your Netgear extender without WPS. Just in case, you face any problems while connecting the extender, refer to the next section and know what to do.

Can’t Connect Netgear Extender without WPS?

Here are the tips to be followed if you are unable to connect your Netgear extender using the Nighthawk app or the web browser:

  • Always connect your Netgear extender to a socket that is not damaged.
  • There should be a distance of at least 8ft between your extender and router.
  • Ensure that your extender is kept in an area that is free of WiFi interference.
  • Do not use the outdated version of the Nighthawk app or the web browser to connect Netgear extender.
  • In the manual method, be certain that you are entering the login address into the URL field of the web browser. The search bar must be avoided.

The Final Words

We are now about to conclude our guide explaining how to connect Netgear extender without WPS. Hopefully, you will be able to complete the process using any one method we’ve discussed above. Now, you are free to connect your WiFi devices to the newly extended network.

Before wrapping up everything, we want to let you know that if you keep the firmware of your extender updated, it will perform much better. The best part is that you can complete Netgear extender firmware update manually as well as through the Nighthawk app.

Tags: ,
Disclaimer: The netgerext.net is a website providing technical resolution and information on various issues and providing online support services for networking gadgets. Use of any images, logo, brand or product names on our site is just for informational and referential purpose. Technical help & services are provided on customer request.