A network drive or a mapped drive can be considered a shared storage device on a LAN within a home or business. It can be a physical interface or a virtual one that serves the purpose of helping users access the files from those devices that are connected to a common network. For example, if you have installed the router using the default routerlogin details, you will be able to access the contents of all the devices that are connected to the router’s networ. However, your network drive is also supposed to be connected to the router. In this post, we will shed light on how to map network drive Windows 10. Continue reading.
The steps to map the network drive on Windows 10 are mentioned below. You are required to ensure that you are accessing a high-speed internet connection. To put it in easy words, there needs to be no internet-related problem from the ISP’s end. Once ensured, go through the steps given here.
First of all, you are required to do is to connect the computer to the WiFi network. You can also connect the computer and your AP with the aid an Ethernet cable. But, ensure that your AP as well as your computer is flaunting an updated firmware version. Apart from this, your computer must be connected to the network on which your network drive and other devices are present. Otherwise, mapping the network drive won’t be possible.
This is for your information that you can map network drive and get it from File Explorer without getting involved in the hassle of finding it and entering its web address every time in a web browser. This blog will talk about the same method.
After you’re done connecting your PC to the network, consider opening the File Explorer from the taskbar. You can also go the same by clicking the START menu (Windows icon). The shortcut to access the same is to press the Windows key and E. The File Explorer will show up on your computer’s screen.
Now, select the THIS PC option. It is located at the left pane. Go to the COMPUTER tab and select MAP NETWORK DRIVE.
After selecting the Map Network Drive option from the top pane, you need to select a drive letter in the DRIVE list. For your information, any available letter will do the job for you. After that, go to the FOLDER box and input the path of the folder or computer. You also have the option of browsing the folder. Simply, click the BROWSE option. Select FINISH.
To connect to and map network drive Windows 10 every time you sign in to your computer, you have to select the RECONNECT AT SIGN-IN option before hitting FINISH.
This is how you can map network drive on a Windows 10 PC. Just in case you cannot connect to your network drive or folder, then there is a possibility that the device you are trying to connect might be now powered up. There are also chances that you do not have the correct permissions. In that case, you are supposed to contact your network administrator.
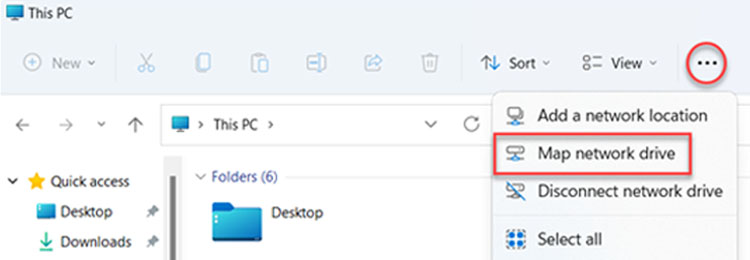
If you want to map network drive on Windows 11 computer, then the steps will remain the same. However, you will find the MAP NETWORK DRIVE option under the MORE option. In case you are unable to locate it there too, then you can right-click on the THIS PC node in the folder pane. A command will be available there.
Now, it is time to wrap up the guide revealing how to map network drive Windows 10. Here, you learned the whole nine yards of the process. Apart from this, we also provided you with the highlights of mapping the network drive on a Windows 11 PC. But, we want you to make sure that all your devices are present on the same network as your network drive. Otherwise, you won’t be able to complete the process.
Hopefully, you will be able to map the network drive with the help of the instructions provided in the post.
Tags: map network drive, windows 10 map network drive
Dave Francis is a WiFi network expert and a technical writer dedicated to helping users optimize their home networks. He focuses on providing clear, actionable steps to help readers get the best service out of their devices. With the background in Information-Technology and passion for WiFi devices, he provides practical advice and solutions for setting up and managing Wi-Fi devices. He breaks down technical issues and offers simplified solutions through easy guides and tutorials.

