How to Set Up Netgear 48 Port PoE Switch [An Ultimate Guide]

How to Set Up Netgear 48 Port PoE Switch [An Ultimate Guide]

Netgear manufactures 4 types of 48-Port PoE switches. These are Unmanaged, Smart, Smart Cloud, and Fully Managed switches. It is very easy to set up a Netgear 48-Port PoE switch. You just need to connect an Ethernet cable between your PoE switch and the WiFi router to make it up and running. The Ethernet cable will supply electricity as well as internet to the switch.

If we talk about Smart, Smart Cloud, and Fully Managed switches, they can be installed using the same approach. For your information, Fully Managed switches are the most advanced switches. Therefore, we are listing the steps to install a 48-Port Netgear PoE switch.

How to Install Netgear 48-Port PoE Switch?

You can use any of these given methods to install your PoE switch that is fully managed:

  • Audio-video local browser interface
  • Main local browser interface
  • CLI (Command Line Interface)

Now, read below to know the steps to install a 48-Port PoE switch using three methods. Know that you can also connect a Netgear extender to a switch after completing the setup process to create a new extended network, Netgear_ext.

1. Setup via Audio-Video (AV) Interface

Here are the steps that you should follow to perform switch setup via the audio-video local browser interface:

  • Power up your Netgear switch using its power adapter.
  • If the light becomes solid yellow, apply the power again and let the switch LED go solid green.
  • Now, connect an Ethernet cable from the computer’s Ethernet port and the OOB or Ethernet network port on the switch.
  • Load an internet browser now and type the default IP address of the switch.
  • If you are using the Ethernet port of the switch, use 169.254.100.100.
  • In case you have used the switch’s OOB port, use the 192.168.0.239 IP.
  • You will see the login page.
  • To access the AV UI of the switch, type admin into the Username field and leave the Password field blank.
  • Click the button labeled AV UI Login.
  • Specify the password for your 48-Port PoE switch.
  • Configure switch settings using the on-screen instructions.
  • Save the changes.

2. Setup via Local Browser Interface

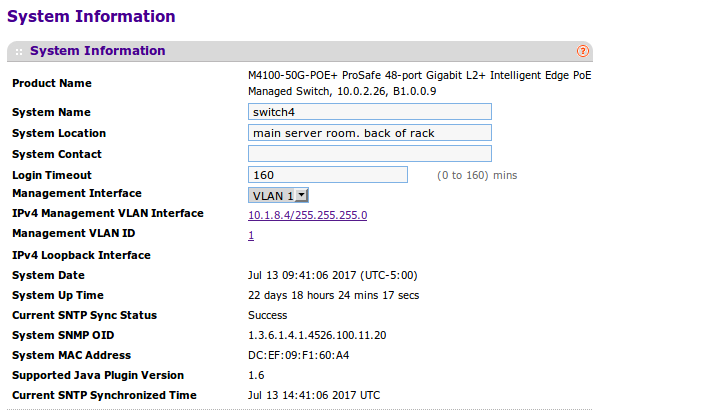
The steps given below will help you understand the process of setting up the Netgear 48-Port PoE switch using the Local Browser interface:

  • Connect your switch to a working electrical outlet via power adapter.
  • You can also run an Ethernet cable from the router’s LAN port to the switch’s LAN port.
  • Wait for the light to become solid green.
  • Connect your computer and the fully-managed Netgear switch.
  • Access http://169.254.100.100 or http://192.168.0.239 depending on the switch ports you have used.
  • To log in to the browser interface, select the Main UI Login button.
  • Enter admin into the Username field and click the Login button.
  • Thereafter, specify the password for your switch and save the changes by following the on-screen instructions.

switch login

3. 48-Port PoE Switch Setup via CLI

Here are the steps that you need to follow in order to set up your Netgear switch using the Command Line Interface:

  • On the basis of connector type at your computer and the switch port you are going to use, use USB Console cable or Console cable.

Note: For Type-C USB port, use USB Console Cable. If you are using the RJ-45 RS232 Console Port, use the Console Cable.

  • Connect the Ethernet cable to the appropriate ports of the switch and computer.
  • If you have used the Console Port of the switch, start the Terminal Emulation Program:
  • For Windows OS, use HyperTerminal or Tera Term
  • If you are using Mac OS, use Term
  • In Linux OS, you can use Minicom
  • Configure the terminal emulation program to use baud rate, 115,200 bps; data bits 8; parity, none; stop bit, 1; flow control, none.
  • Log in to the switch using the Username admin.
  • At the Password prompt, leave the field blank and press Enter.
  • Specify the password for the switch.
  • Use the CLI to configure the switch IP address and other settings.
  • The switch is configured now.

The Bottom Line

This is how you can configure a Netgear 48 Port PoE Switch. It is expected that you will be able to make your switch up and running using one of the given methods.

Tags: ,
Disclaimer: The netgerext.net is a website providing technical resolution and information on various issues and providing online support services for networking gadgets. Use of any images, logo, brand or product names on our site is just for informational and referential purpose. Technical help & services are provided on customer request.